You spent hours fitting every piece together, and now your finished wooden puzzle sits rolled up in a tube or stacked in a corner, slowly warping. It’s one of the most common frustrations puzzle lovers face: a beautiful, handcrafted creation that deserves wall space but ends up forgotten. Framing a puzzle the right way preserves every detail, turns your work into genuine wall art, and makes it a gift worth giving. This guide walks you through every stage, from gathering the right tools to hanging a display that holds up for years.
Table of Contents
- What you need for framing puzzles
- Step-by-step instructions: How to frame your puzzle
- Common mistakes and troubleshooting tips
- Long-term care and creative display ideas
- Turn your masterpiece into timeless decor with Lubiwood
- Frequently asked questions
Key Takeaways
| Point | Details |
|---|---|
| Choose quality materials | Use UV-protective frames, right adhesives, and backing boards for a professional look. |
| Follow step-by-step process | Preparing, gluing, backing, and framing ensure your puzzle remains flat and display-ready. |
| Avoid common pitfalls | Measure the finished puzzle, not the box, and protect your art from sunlight and humidity. |
| Rotate and maintain displays | Seasonal rotation and gentle dusting keep framed puzzles vibrant and long-lasting. |
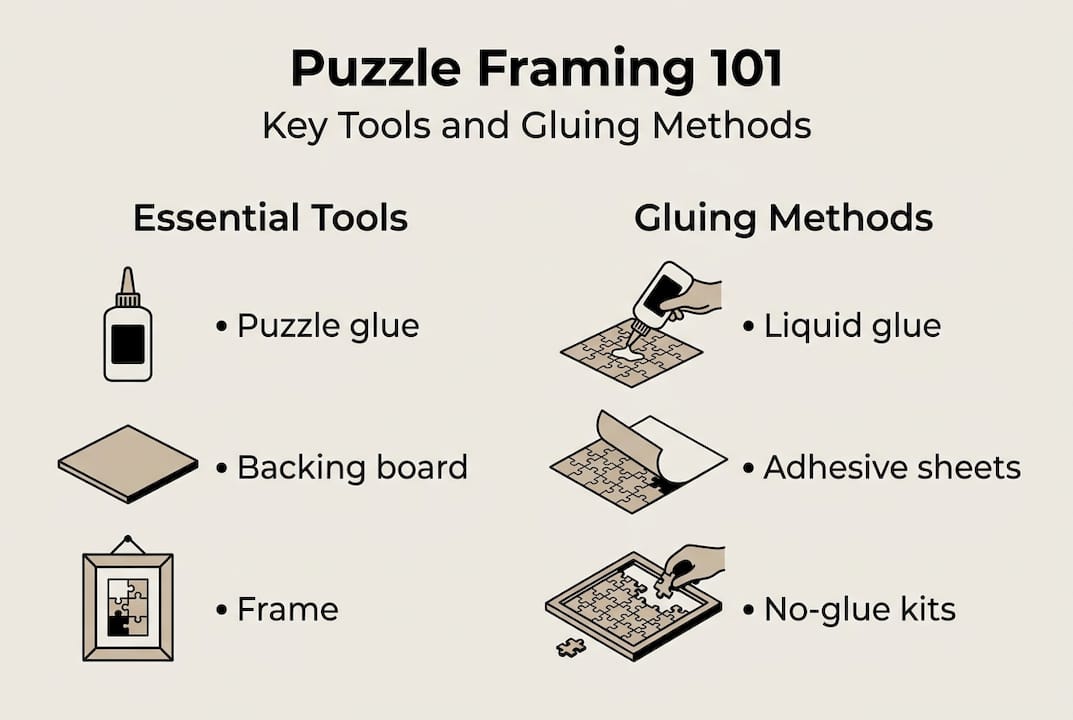
What you need for framing puzzles
Getting the right materials together before you start saves you from mid-project headaches. The core mechanics for framing puzzles involve flattening the completed puzzle, securing pieces with adhesive, mounting on a backing board, and inserting into a frame with sufficient depth. Each step depends on having the right supply ready at the right moment.
For wooden puzzles specifically, material choices matter more than they do for standard cardboard sets. Wood pieces are thicker, heavier, and more sensitive to moisture, so your frame needs extra depth and your adhesive needs to be compatible with the wood surface. Check out this wooden puzzle framing guide for a deeper look at wood-specific considerations.
Core supplies you’ll need:
- Puzzle glue or adhesive sheets (liquid glue for cardboard, back-only application for wood)
- A foam board or rigid backing board cut to your puzzle’s actual finished size
- A frame with at least 0.5 inches of depth to accommodate wooden pieces
- UV-protective acrylic glazing (not standard glass, which offers no UV defense)
- A soft brush or foam roller for even glue application
- Parchment paper and heavy books for flattening
- A ruler and measuring tape
| Supply | Best for wooden puzzles | Best for cardboard puzzles |
|---|---|---|
| Liquid puzzle glue | Back-side only | Front and back |
| Adhesive sheets | Yes, no-mess option | Yes |
| UV acrylic glazing | Essential | Strongly recommended |
| Deep-set frame | Required | Optional |
| Foam board backing | Recommended | Recommended |
One detail most people miss: always measure your finished puzzle, not the dimensions printed on the box. Manufacturers’ stated sizes can be off by half an inch or more, and a frame that’s even slightly too small will crack pieces under pressure. For more on sizing, the displaying jigsaw puzzles guide covers measurement tips in detail.
Pro Tip: If you’re framing a puzzle as a gift, look for complete puzzle kits that bundle glue, backing board, and a frame together. They remove the guesswork and make the presentation feel polished right out of the box. Quality puzzle frame advice recommends UV-protective acrylic as a non-negotiable for any puzzle meant to last.
Step-by-step instructions: How to frame your puzzle
With your materials assembled, you’re ready to transform your puzzle into display art. Here’s exactly how to do it.
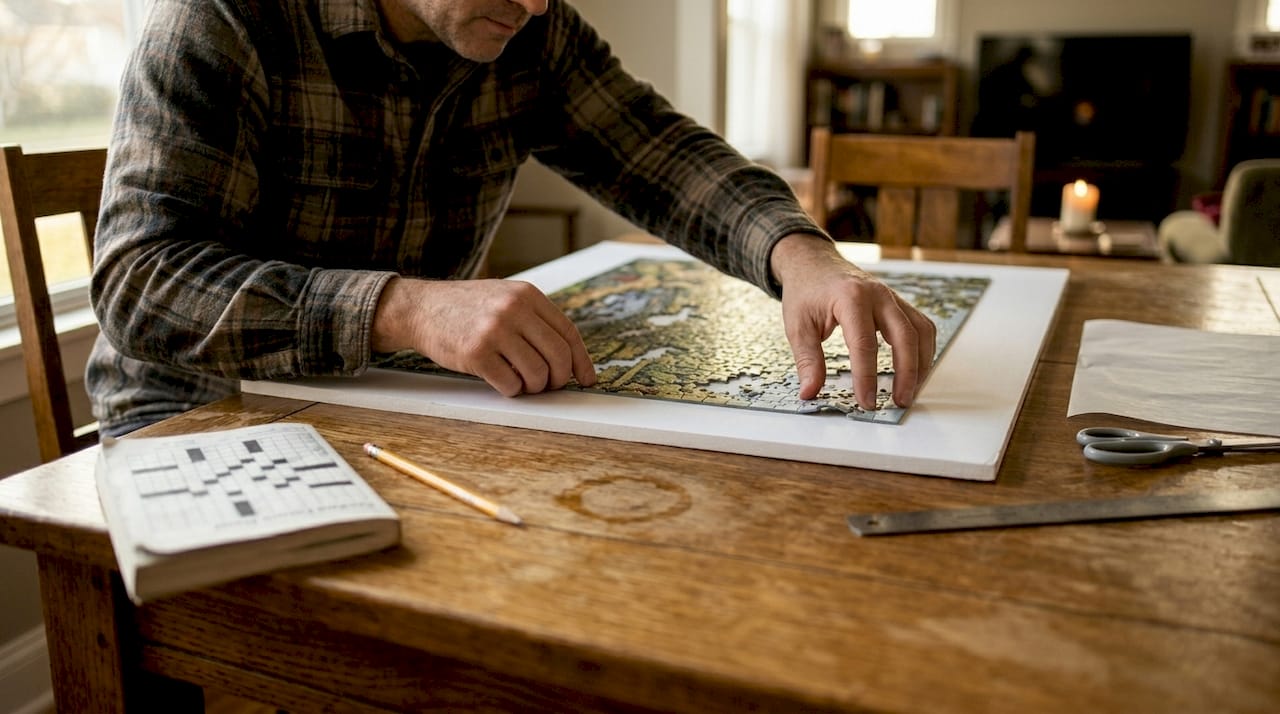
1. Flatten the puzzle. Slide a thin, rigid board under your completed puzzle and transfer it to a clean, flat surface. Lay parchment paper on top and stack heavy books evenly across the surface. Leave it for two to four hours. This step is especially important for wooden puzzles, which can develop a slight bow after assembly.
2. Apply adhesive. For cardboard puzzles, brush liquid puzzle glue evenly across the front using a foam brush, working from the center outward. For wooden puzzles, flip the puzzle carefully and apply glue only to the back. This protects the natural wood finish and avoids any unwanted shine on the surface.
Always glue the back of wooden puzzles, never the front. Applying glue to the wood surface can create a plastic-like sheen that dulls the natural grain and finish.
3. Let it dry fully. Glue typically needs 4 to 6 hours to dry completely. Resist the urge to rush this step. Partial drying leads to warping, and warped puzzles rarely sit flat inside a frame.
4. Attach to backing board. Once dry, carefully lift the puzzle and center it on your pre-cut foam board. Press gently and evenly across the surface. If you used adhesive sheets instead of liquid glue, peel and apply the sheet to the backing board first, then press the puzzle down.
5. Choose and assemble the frame. Select a frame that matches your measured puzzle dimensions. Deep-set frames (sometimes called shadow box frames) work best for wooden puzzles. Slide the mounted puzzle into the frame and secure the backing clips. For detailed sizing help, the puzzle size guide makes it easy to match puzzle dimensions to standard frame sizes.
6. Insert UV acrylic glazing. Place the UV-protective acrylic sheet in front of the puzzle before sealing the frame. UV-protective acrylic prevents fading and shields the artwork from the slow color damage that sunlight causes over months and years.
| Method | Drying time | Best for | Finish result |
|---|---|---|---|
| Liquid glue (front) | 4 to 6 hours | Cardboard puzzles | Slight sheen |
| Liquid glue (back) | 4 to 6 hours | Wooden puzzles | Natural finish |
| Adhesive sheets | Instant bond | All puzzle types | Matte, clean |
| No-glue kit | No drying | Temporary display | Removable |
Pro Tip: Use a puzzle saver kit that includes adhesive sheets and a backing board. It’s faster than liquid glue and leaves zero mess, which is ideal when you’re framing a puzzle as a gift and want a clean result.
For very large puzzles, large puzzle framing requires sectional gluing and extra support, which we cover in the next section.
Common mistakes and troubleshooting tips
Even with a careful approach, a few stumbling blocks can sneak in. Here’s how to sidestep the most common pitfalls.
Warping from weak or watery glue. This is the number one complaint. Cheap puzzle glues are often too thin, and they soak into the puzzle rather than bonding the surface. The result is a warped, wavy puzzle that won’t sit flat in any frame. Fix it by re-flattening under books for 24 hours, then applying a second coat of a thicker, puzzle-specific adhesive.
Poor frame fit from wrong measurements. If you measured the box instead of the finished puzzle, your frame may be too small or too large. A frame that’s too tight will crack wooden pieces. Always re-measure the actual assembled puzzle before ordering or buying a frame.
Large or oddly shaped puzzles. Large puzzles over 1,000 pieces need sectional gluing, foam board sandwiching, and often professional framing to stay intact. For puzzles with unusual shapes, custom backing boards cut to the puzzle’s outline give the cleanest result. The odd-shaped puzzle tips page covers this in detail.
Always use foam board for structure when moving large puzzles. Carrying a large glued puzzle without rigid support underneath will cause it to flex and crack along piece seams.
Display location mistakes. Hanging a framed puzzle above a fireplace, near a bathroom, or in a west-facing window accelerates fading and warping. Heat, moisture, and direct sunlight are the three enemies of any framed puzzle.
Common mistakes at a glance:
- Using regular glass instead of UV acrylic (allows fading)
- Skipping the flattening step (leads to uneven glue application)
- Rushing the drying time (causes bubbling and warping)
- Choosing a frame that’s too shallow for wooden pieces (cracks pieces)
- Hanging in high-humidity rooms without a sealed frame
Pro Tip: Complete kits with UV acrylic and quality wood frames typically run $50 to $75 and eliminate the most common fit and fading issues in one purchase. They’re especially worth it for handcrafted wooden puzzles where the artwork is genuinely irreplaceable. For custom-shaped or personalized puzzles, the custom puzzle framing guide walks through specialized options.
Long-term care and creative display ideas
Once your puzzle is proudly hung or given, a little care goes a long way in keeping colors fresh and memories vivid.
Location is everything. The ideal spot for a framed puzzle is a wall that gets indirect light, stays at a consistent temperature, and sits away from vents, radiators, or windows. Kitchens and bathrooms introduce too much moisture. Living rooms and bedrooms with stable humidity are ideal.
Dust softly and maintain 40 to 55% relative humidity to keep your puzzle in peak condition. High humidity causes wood pieces to expand slightly, which can push against the frame and loosen the bond over time. A simple hygrometer (a device that measures air moisture) costs under $15 and tells you instantly whether your display space is safe.
Long-term care checklist:
- Dust the frame and acrylic surface monthly with a soft, dry microfiber cloth
- Never spray liquid cleaners directly onto the acrylic face
- Check the backing clips every six months to make sure they haven’t loosened
- Keep the puzzle away from direct sunlight, even with UV acrylic protection
- Store any unframed puzzles flat in a cool, dry space using proper puzzle storage solutions
One creative idea that puzzle collectors love: rotate artwork seasonally using the same frame. Swap out a winter landscape in spring for a floral or nature design. This keeps your wall art feeling fresh without buying new frames every time. You can even create custom wooden puzzles from personal photos and rotate them as seasonal gifts or home accents.
Framed puzzles also make genuinely memorable gifts. A completed and framed wooden puzzle given for a birthday or anniversary carries far more personal weight than a standard print. The combination of handcrafted materials, personal effort, and lasting display makes it a gift people actually keep.
Pro Tip: Controlling humidity in your display room is the single most effective long-term care step you can take. A small plug-in dehumidifier or humidifier keeps the air in the ideal 40 to 55% range and protects both the wood pieces and the frame finish.
Turn your masterpiece into timeless decor with Lubiwood
If you’re inspired to showcase your puzzle skills or give a gift that lasts, find creative solutions all in one place. At Lubiwood, every puzzle is laser-cut from premium sustainable wood, designed to be both a satisfying build and a piece of art worth displaying. Whether you’re framing your first puzzle or looking for your next project, the right starting point matters.
Browse the full collection of wooden jigsaw puzzles to find designs that look as stunning on the wall as they do on the table. If you want something with even more dimension, the 3D wooden puzzles collection offers sculptural builds that display beautifully without any framing at all. Before you order, use the puzzle size guide to match your chosen design to a frame size you already own or plan to buy. Every Lubiwood puzzle ships ready to build, display, or gift.
Frequently asked questions
What is the best way to keep a wooden puzzle flat during framing?
Carefully slide a thin board under the completed puzzle and press gently with parchment or wax paper and books for a few hours before gluing. This flattening step is essential for wooden puzzles, which can bow slightly after assembly.
Can I frame puzzles without using any glue?
Yes. Adhesive sheets or no-glue kits allow you to mount and display puzzles without liquid adhesive, which is ideal when you want to preserve the option to disassemble the puzzle later.
How do I prevent my puzzle art from fading over time?
Always use UV-protective acrylic glazing when framing, and avoid hanging the puzzle in direct sunlight. Even indirect light causes gradual fading without UV protection in place.
How much does professional puzzle framing cost?
Professional framing for large puzzles typically ranges from $80 to $200, depending on puzzle size and custom requirements. Complete DIY kits for standard sizes like 20 x 27 inches run closer to $50 to $75.
What’s the best way to clean a framed puzzle?
Dust softly with a dry microfiber cloth and avoid any liquid cleaners on the acrylic surface or frame finish. A gentle monthly wipe-down is all it takes to keep the display looking sharp.
